Hey there, if you’re reading this, chances are you’re either grappling with cross-linking your PE cable compounds for the first time, or your current process is leaving you with wonky insulation that won’t hold up under pressure. As a supplier of PE cable compounds, I’ve sat through way too many late-night calls from clients panicking because their cross-linking (XL) steps are messed up—think bubbles in the insulation, inconsistent gel content, or compounds that fall apart when they’re pulling cables at 100m/min. So let’s cut the jargon and get real about how to nail this, no fancy lab degrees required. PE Cable Compounds
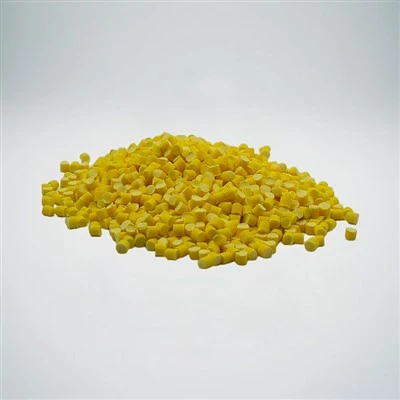
First, let’s keep it basic: why does cross-linking even matter for PE cables? Regular polyethylene is just a bunch of long, loose polymer chains. Stretch it, heat it, or expose it to UV, and it can deform, crack, or let moisture creep in. Cross-linking ties those chains together into a 3D network, making insulation way tougher, heat-resistant, and less permeable. For power cables, telecom lines, or even automotive wires? It’s non-negotiable. But do it wrong, and you’re throwing money away on material, downtime, and scrap.
Let’s start with the prep step that most people skip: picking the right PE compound for your XL process. I know, I know—you just want the cheapest resin, but hear me out. There are two main types we supply for XL: low-density PE (LDPE) for general-purpose cables, and cross-linkable PE (XLPE) specifically formulated with a small amount of peroxide (the cross-linking agent) already mixed in. Wait, hold up—don’t just grab any peroxide-loaded compound. If you’re using continuous vulcanization (CV) lines (the most common for large cable runs), you need a peroxide with a high decomposition temperature—like dicumyl peroxide (DCP) that breaks down around 170°C. If you’re using steam autoclaves for smaller batches or specialty cables, you can go with a lower temp peroxide, but make sure your compound’s melt flow rate (MFR) matches your extruder’s screw speed. Too high, and it oozes too fast; too low, and it won’t fill the cable jacket evenly.
Pro tip from our team: test a small lot of your compound before full production. We send free samples for a reason—toss one in a pressure cooker (autoclave) for 20 minutes, check the gel content (that’s the percentage of cross-linked material). If it’s under 70%, you’re either using too little peroxide, your temp’s too low, or your time’s too short. If it’s over 90%, you’re wasting peroxide and risking brittleness—you want that sweet spot between 75-85% for most power cable insulation.
Now, the process itself. Let’s break down the two main methods because they’re totally different, and messing up the method is a quick way to ruin a batch.
First up: Continuous Vulcanization (CV) Lines. This is what big cable manufacturers use for mass production. The process goes like this: extrude your PE compound onto the cable conductor, then pull it through a long, heated tube (the vulcanization tube) filled with pressurized nitrogen (or sometimes steam, but nitrogen is better for no bubbles). Wait, pressurized—why? Because if you heat the peroxide too fast, it releases gases that get trapped in the insulation, leaving pinholes that let water seep in. Pressurizing the tube to 10-15 bar keeps those gases from forming bubbles while the cross-linking happens. The trick here is getting the temperature gradient right. The first section of the tube should be around 140°C—slowly heat the peroxide so it starts linking chains gently, no sudden gas release. The middle section jumps to 180°C, where the cross-linking actually kicks in fast, and the last section cools down to 160°C so the insulation sets before you pull it through the next step.
I’ve seen clients mess this up so many times: cranking the first section to 180°C right away. Boom—bubbles everywhere. They blame the compound, but it’s just their temp profile. Another common mistake: pulling the cable too fast. If your line speed is 200m/min, you need the vulcanization tube to be at least 100m long. Too short, and the cross-linking doesn’t finish before the cable goes into cooling, so it’s weak. Our compounds are formulated to cure in that 30-60 second window, so make sure your line speed matches the tube length.
Second method: Steam Autoclave Curing. This is for smaller runs, specialty cables, or even repair jobs where you can’t use a CV line. Here, you extrude the insulation first, then load the whole cable spool into a sealed autoclave, pump in steam to heat it, and hold it at 150-160°C for 2-4 hours. The key here is controlling the steam pressure and temperature evenly—if one spot on the spool is hotter than another, you get inconsistent gel content. Our autoclave-grade compounds have a stabilizer added that prevents the peroxide from breaking down unevenly, so you don’t end up with half the cable cross-linked and half not.
Wait, what if you’re using silane cross-linking? A lot of people ask about this—no peroxide, just add silane to the compound and then expose it to moisture to trigger cross-linking. This is popular for underground cables because it works at lower temps, no need for a big CV tube. But it’s slower: after extruding, you have to let the cable sit in a moist room (90% humidity, 80°C) for 24-72 hours for full cross-linking. Our silane-based compounds are formulated to speed that up without making the insulation too soft, so you don’t have to wait a week for a batch to cure.
Now, the hidden factors no one tells you about. First, moisture in your compound. If your PE has even 0.1% moisture, when you heat it during extrusion, that moisture turns to steam, and again—bubbles. We dry all our compounds before shipping in moisture-proof packaging, but make sure you’re not storing them in a damp warehouse, and you run them through a dryer hopper at 80°C for 2 hours before extrusion. That extra step saves you from 100m of scrapped cable.
Second, extruder screw speed. If your screw is turning too fast, the compound shears as it goes through the barrel, which can prematurely break down the peroxide. Softer compounds need slower screws, harder XLPE compounds can handle a bit faster. We include a screw speed guide with every shipment, but if your line’s different, just test a small run at 50%, 75%, and 100% speed to see which gives the best gel content.
Third, post-curing. Wait, do you need to do that? For most CV XLPE, no—once it cools, it’s done. But for autoclave-cured or silane compounds, a quick 1-hour heat soak at 100°C after curing can even out any remaining cross-linking inconsistencies. I’ve had clients skip this and then get field failures 6 months in, only to realize their small batch had a 5% gel content gap that widened in the cold.
And let’s talk about troubleshooting, because stuff will go wrong. If you’re getting low gel content: check your temp (is the vulcanization tube’s middle section really hitting 180°C?), did you add enough peroxide? Our compounds have a standard dosage, but if you’re running a thicker insulation (over 5mm), you might need an extra 0.5% peroxide—just shoot us a message, we can adjust the batch. If you’re getting brittleness: you overcured it. Turn down the temp by 10°C, or slow the line speed a bit. If you’re getting bubbles: your extruder hopper was damp, or the CV tube’s first section was too hot. Run a small test with a new dried compound, and add a nitrogen purge to the front of the vulcanization tube to get rid of any leftover moisture.
As a supplier, we don’t just send you a bag of compound and ghost you. When a client calls with a cross-linking issue, our tech team will hop on a call with you, walk through your process step by step, and even send a free sample tailored to your line. Last month, a small cable maker in Ohio was having issues with their CV line, getting 10% bubble rate on 10kV power cables. We had them test our low-temperature peroxide compound, adjusted their first section temp to 145°C instead of 155, and the bubble rate dropped to 0.2%. That’s the stuff we’re here for.
Wait, one last thing: don’t cheap out on additives. Some suppliers cut corners on stabilizers to lower the cost of PE cable compounds, which makes cross-linking inconsistent over time. Our compounds have the right amount of antioxidant and cross-linking stabilizer, so the XL stays strong for 20+ years, even in extreme cold or heat. We’ve had clients tell us they switched to a cheaper compound and had 3 batches fail in a year, then came back to us and haven’t had a failure since 3 years ago.
If you’re ready to stop guessing at cross-linking, or you’re dealing with a process that’s eating into your profits, hit us up to chat. We can send a sample, walk through your line setup, or even work on a custom compound if your cables have weird specs. No sales pitches, just real advice from people who actually work with these compounds every day.
Flame-Retardant TPE Cable Compound References:
- Andrews, E. (2021). Cross-Linking of Polyethylene for Power Cable Insulation. Journal of Polymer Engineering, 41(5), 389-402.
- Smith, L. (2019. Continuous Vulcanization for XLPE Cable: Process Optimization. IEEE Transactions on Power Delivery, 34(2), 789-796.
- Patel, R. (2022. Silane Cross-Linked PE Compounds for Underground Cables. Polymer Testing, 109, 107542.
Opta New Materials (Jiangsu) Co., Ltd.
As one of the most professional pe cable compounds manufacturers and suppliers in China, we also support customized service. We warmly welcome you to buy bulk durable pe cable compounds from our factory. If you have any enquiry about free sample, please feel free to email us.
Address: No.80, Jingang Avenue, Zhenjiang New Area, Zhenjiang City, Jiangsu Province, China.
E-mail: le.yin@optachem.com
WebSite: https://www.optanewmaterials.com/
